A Lesson Learned: Validate Transportation Tickets!

It has been two months since I made this mistake in Siena, Italy, and I remain a little annoyed. I can’t decide if I’m more angry at myself or the Italian public transportation system that sets tourists up for hefty fines by selling open tickets requiring you to validate them once on board using awkward stamping machines. 

Always read the fine print!

As an American who has lived in several major cities, I sometimes get too confident when I approach a new bus or train system. After all, I constantly use public buses and rail systems as my daily transportation in my home city and during all of my travels. I always buy tickets, I tap my pass or ticket before I enter systems; I simply try and follow the rules. However, In my recent visit to Italy I found myself a recipient of a hefty fine for failing to validate a bus ticket onboard.

You Are A Visitor and You Follow Local Laws and Customs

This is a warning to all travelers: Every city and system differs in how they check transportation tickets. Some require you to validate them before entry, some drivers assist you upon entry, some tickets are only valid for one particular date and time, and some tickets require validation using a time-stamp machine inside the vehicle. I knew about these various options, of course, and even used self-validation machines on this same trip. Where I went wrong was following locals entering a bus using the rear door, where there wasn’t a validation machine, and proceeding to forget about my ticket validation. Of course at the end of my bus journey I was caught with an un-validated ticket at my destination. This simple mistake resulted in a hefty $60 fine. It didn’t matter to the officer that my bus ticket was properly purchased that very same day. It didn’t matter that I was a tourist in town for one day only, nor that I was not caught trying to sell the ticket or use it twice. All that mattered is that I didn’t follow the rules of the system I was riding. 

Don’t Ruin Your Day

While I have had time to accept my error, I did spend a lot of time over-thinking this fine. As much as I wanted the ticketing agent to forgive my oversight, to sympathize with a foreign tourist and see that I wasn’t doing anything malicious with my un-validated ticket, the truth is I failed to follow the local system rules. I had to deal with the consequences. Even if paying a fine on top of the original ticket price felt wrong, that didn’t matter in this moment. I knew there were better ways that their validation system should work to prevent this: perhaps an announcement from the driver, a sign on the bus, or requiring riders to enter in the front and go by the validation machine. As an American, I think our agents tend to forgive the rider who makes an unintentional error. I certainly do not want to bring with me an indignant sense of entitlement abroad to cloud the fact that I made a mistake in Italy. No one wants to be an angry “Karen” when caught in the wrong.

The Tabacco shop in siena where I paid my fine

Paying the Fine

My options at the time of ticketing were: 1) I could give the ticketing officer my credit card on the street and immediately pay the fine using his portable reader or 2) he could print a paper ticket and I would have 6 days to pay it within Italy (at a tobacco shop!) before the fine would otherwise double and they would send a collection agency after me using my home address.

I wasn’t willing to risk paying the inflated $120 fine for a delayed payment due to my stubborn and bruised ego, so I took the paper ticket and paid at a tobacco shop of my choosing the next day. I considered just not paying it, but then I envisioned a security agent at the airport the next time I tried to enter Italy taking me aside to a back room to pointing out my name on some long Italian black-list of delinquent travelers. I decided to bite the bullet and pay my fine before it became a worse situation. I will note that it was a minor consolation the cashier at the tobacco shop was sincerely sympathetic as she helped me process my payment. 

You live, you learn!

The Ultimate Packing List for Walking the Camino de Santiago

If you are planning to walk on the Camino de Santiago, you must inevitably create a shopping and packing list. I did this over the summer as I prepared for a solo September walk on the Via Podiensis Camino across southern France. Every item you carry should be considered with discretion because it’s not just about utility, but also the collective weight on your back (and joints and feet) that will help determine the ease in which you’ll walk hundreds of miles.

You should aim to bring everything you think you will actually need and nothing more. But, keep in mind you will likely forget something essential and need to buy it during your first days in Europe. Don’t worry– you will easily find it there. Additionally, if this is your first Camino, you will be tempted to bring too many items and may need to ditch something along the way. Prepare yourself mentally and financially for this inevitability.


THE LIST:

Edited post-Camino to include just essentials.

Backpack: 35-40 L size hiking bag

Trail / Hiking Shoes: be sure to buy one size up from your normal shoe– your toes should not touch the end. I like the Altra or Hoka brands.

Sandals: This is an absolute must. You must leave your trail shoes in the entry of most hostels, so having the sandals both gives you something to wear in the evenings to dinner but also provides feet a needed break from your day shoes. I recommend Teva or Bedrock brands.

Lightweight Hiking Pants: 1 pair with or without detachable shorts. I personally dislike convertible pants as they tend to be cut awkwardly large around the knee to accommodate the zipper.

✅ 2 x Hiking Shorts: I used Patagonia’s 8” Trail Shorts and plan to continue using them.

✅ 4 x Hiking Socks: I love the Darn Tough brand, made in Vermont.

✅ 4 x Underwear: I recommend Outdoor Research’s Men’s Boxer Briefs.

✅ 3 x T-Shirts: made of quick-dry athletic material.

Long Sleeve Shirt: made of thermal/ technical material. I ended up using the REI Co-op Active Pursuits Quarter-Zip Shirt. I would wear it every chilly morning and it was stretchy and easy to strip off when things warmed up. I never used my other long-sleeve shirt on my trip, but would have if I did my walk in colder months.

Lightweight Rain Jacket: or a poncho

Lightweight Jacket : This is for any surprise chilly weather, and could be a light puffer or fleece jacket. If walking May - September you can skip this item. I never used mine and regretted taking it, as the rain jacket could be used instead, layered with a long-sleeve top.

Sun Hat: I used the REI Co-op Sahara Cap with built-in neck cape for sun protection. You will be walking west so the sun is often just behind you! This ended up being an essential item.

Small Packable Daypack: This is a practical item that can add very little weight to your pack. I bought a 4oz , 18L Naturehike bag and used it to carry things around anytime I wasn’t on the trail. This also works great as a personal bag for air travel and rest days.

Toiletry Bag: I liked the small one from LL Bean with just the right amount of pockets and a hanging hook option.

✅ 3 - 4 x Travel Bottles: for all liquids you bring. This should be a 3.4 oz size to comply with air travel requirements.

Shampoo: put in a travel bottle

Body Soap: put in a travel bottle

Face Cream with SPF: put in a travel bottle

Toothbrush & Toothpaste: a 2.5 oz tube is the ideal size for a month

Nail Clippers & Tweezers: you want to keep your toe nails trim.

OTC Pain Medicines: acetaminophen and ibuprofen. I used these some evenings to treat general muscle pain, and more often toward the end of the trip when I developed shin splints.

Band Aids: include various shapes and sizes for covering toe blisters

Compeed / Moleskin / Tape: for blister care

Sewing Kit (w/needle!): I used this to empty blisters and also to sew on Camino backpack patches! 

Foot Lubricant: prevents chafing and blisters inside socks. It seems to work, and I wish I used mine more.

✅ 3 x Ultralight Dry Sacks: I was so glad to have these as I used them to keep my clean clothes separate and protected, and to create order in my otherwise messy backpack. 

Water Bottle 1L: I used a collapsible one with a carabiner from Vapur. 

Quick Dry Towel 

✅ 6 x Ziplock bags: for keeping small items dry like pills, bandaids, passports, etc.

Twin Bed Sheet & Pillowcase: the bed sheet was enough for France, but I understand that in Spain it is better to have more mattress protection, so most bring a sleeping bag liner instead.

Portable Charger: for cell phone backup power. I used Anker brand.

Clothes Washing Detergent Strips: I used Breezeo and about 20 strips were enough for a month.

Trail Guide / Map

Essential Documents: printed itinerary, flight Info, copies of passport, etc

Essential Cards: ATM card, credit card, driver's license

Passport: must be valid for 6 months beyond your departure date.

Pilgrim Passport: if you acquire prior to arrival in Europe, otherwise found easily in your departure city.

Phone & Charger Cord

✅ 2 x Europe Converter Plugs : 2 small

OPTIONAL

Earphones

Diary & Pen 

Eye Mask

Earplugs

Camino Santiago Trail Sign

MORE ADVICE: 

TOTAL PACK WEIGHT: The total weight of your full pack plus 1 liter of water should be 20-lbs, max. Mine was just over 20lbs and I had the heaviest bag of the folks I encountered on the trail. Do yourself a huge favor and fill up your bag and weigh it. What you think you’ll bring a few weeks prior to your trip almost never is what you actually end up walking with once reality sets in!

THE SHOES: I read countless Camino discussion forum musings on footwear preferences: mainly hiking boots, hiking shoes, and trail shoes (even hiking sandals!). Now, there are those who have personal requirements for ankle support, and those people should probably opt for hiking boots. On the other hand, there are those who feel more confident in their stability and choose the lighter trail shoe.

This choice was actually a difficult one for me. As an almost-fit man squarely between my youthful years and retirement age, I felt like I was taking a slight risk when I decided to bring uber light trail shoes (Altra Lone Peak 6). First of all, I had never purchased them before, and second, my long history of hiking had always included sturdy leather boots. Long story short, I was sold on the trail shoes because they allow the toes to splay and breathe better, which can result in blister prevention. I got a few blisters anyway, but was glad for the extra toe space and quick-drying material.

THE BACKPACK: Backpack selection is important. You likely already know that you should not bring a large and heavy camping pack. The Camino is a through-hike, meaning you will walk for weeks at a time and not for a short camping trip. Also, you will likely not be lugging a heavy tent, stove, and food supply, instead, you will pack as light as possible and get food and rest daily from establishments on route. For most, a 30-40L pack is ideal. You will want help from an expert at an outdoor store like REI, as it’s essential you find a pack that sits properly on your hips and shoulders to provide you with ideal weight distribution and support. Many Americans choose a lightweight Osprey backpack, but I also saw a few Gregory packs on the trail.

EVERYTHING ELSE: Selecting the various smaller items is what can be the fun part, and this is where creating the above checklist helped me not forget anything over several months of planning. I say it’s fun because I enjoyed tracking these all down over time, and where you can spend some time making choices based on your personal taste. There are many items to buy and thankfully most are somewhat inexpensive and therefore less heartbreaking if you have to lighten your load mid-Camino. It helped me to know there are sports shops in the larger towns along the Camino where countless people end up purchasing shoe inserts, replacement socks, knee braces, or shampoo. I discovered the selection and prices in France and Spain, at Decathlon for example, were totally reasonable, and in fact around half the cost of similar items in Seattle.

LIGHTWEIGHT & QUICK DRY MATERIALS: I constantly kept weight in mind while shopping, reading once that someone was so desperate to shave off weight during the camino, that they sawed off the handle of their toothbrush. This visual helped me as I left behind my favorite cotton shirts and underwear, packing instead nearly weightless synthetic versions. And of course I recommend you leave behind that hardcover copy of Eat, Pray, Love. 

PILGRIM PASSPORT: Learning of this tradition was initially confusing, as I worried I would need to go through an awkward process akin to joining the Catholic church to be anointed pilgrim status. Eventually, I realized either the pilgrim passport can easily be purchased for a few dollars in your Camino town of departure, or you can even order one online beforehand. I received one for free from the American Pilgrims on the Camino organization, though it took a month for it to arrive. I ended up using one from my departure city in France because it felt more unique and authentic to the Camino I had chosen.

You may wonder how easy it will be to get passport stamps on a daily basis. Will you need to knock on ancient village church doors and beg? I will discuss this in a future article, but let me reassure you— it’s easy. You can always get a stamp at your evening place of sleep, even in most hotels, along with many other spots around each trail village, like tourist offices and cafes.

Is there anything missing from my list that you would have brought along? Let me know!

Trip Planning and the 2020 Coronavirus Pandemic

Brooklyn Bridge Without Crowds During Coronavirus Pandemic

Brooklyn Bridge Without Crowds During Coronavirus Pandemic

It’s April 2020 and I am one of the millions on lockdown inside a small New York City apartment, dreaming of the day the world will be safe enough to open up again. The coronavirus/COVID-19 pandemic is in full swing and like most of us, I was thoroughly unprepared. Being a travel fanatic, I attempt to stay sane by focusing on the day I can get back to travel adventures and cuisines not cooked up in my tiny Brooklyn kitchen. 

Get Caught Up In Travel Research

So, what’s a travel nut to do when the world shuts down? I have spent more than enough time pondering this very question. The most productive thing to do is to stop wondering about when travel will be safe again and spend more energy on virtual exploration. As I have covered in my article on travel planning and creating travel maps, the planning stage is very nearly as exciting as the travel itself. Why not continue to discover and learn about travel by using travel blogs, Google Maps, and watching old travel shows on Netflix and YouTube? Keep building your lists of charming villages, quirky cafes, and exciting museums, even if your trip could be a year or more away.

Did You Already Book A Summer 2020 Trip And Don’t Know What To Do?

If you’re like me, you may have planned and paid for a summer 2020 trip before this pandemic began. My trip is booked to Portugal and Spain in late June, so I am currently waiting to see what will happen. Many airlines and home stay companies aren’t yet proactively refunding tickets for flights occurring mid-to-late-summer and purchased pre-pandemic. Experts agree you should keep waiting until closer to your departure month to see if the airline cancels your flight, or if the flights aren’t cancelled, they should kindly offers vouchers for later travel.

Signs in Brooklyn’s Prospect Park During Coronavirus Pandemic

Signs in Brooklyn’s Prospect Park During Coronavirus Pandemic

Affordable Travel Alternatives To That Big International Trip

The travel industry may not recover for a long time (years, maybe) due to the enormous upset the coronavirus pandemic has caused. Many hotels and home stay flats may not re-open. Restaurants and cafes may not find funds to immediately serve again. And of course, a huge number of would-be travelers will be in a less financially secure place than they were a few months ago. 

So, while dreaming of far-off travel can help pass the time in isolation, you may want to also begin planning a more affordable, local escape for when restrictions ease in your region. This could very well be in the form of a road trip to someplace rural. Perhaps to my favorite bucolic state, Vermont

You’re Still Tempted To Book A Flight

You might be feeling like taking a risk and booking a cross-country flight since US airfare deals currently cost about as much as a dinner for two, just realize some of those low fares may not be fully refundable. Do not book anything with cancellation fees and always read the fine print. However, due to the low cost, it’s not a huge gamble. 

International fares are also cheap right now, but you take increased risks, even if federal restrictions are lifted and the flight occurs. If there’s a recurrence of the virus while you’re away, for example, you’ll risk having a trip ruined and the potential extra costs of getting yourself home in an emergency. Not to mention the frightening risks of getting sick while abroad.

If you are a risk-taker, book with an airline that offers free change and cancellation. Many major airlines in the U.S. are offering this right now if you buy a ticket before the end of May, 2020 for the upcoming year.

Be sure you pay for your travel with a credit card instead of a debit card. It is always much easier to get your money back if the airline ends up canceling your flight when you use a credit card.

Finally, hold off on other non-refundable purchases for any trip, like the hotel accommodations and tours. Only book these things when you're certain your trip will happen. Hotel costs are way down and there won’t be as many people traveling in the coming year, so if your trip does occur, you should not have to worry about expensive lodging rates or many crowds once you get there.

Stay safe out there, everyone!

Community Support for Essential Workers During NYC’s Coronavirus Lockdown

Community Support for Essential Workers During NYC’s Coronavirus Lockdown

Put A Star On It: Using Google Maps To Organize A Trip

todd-google-map-stars


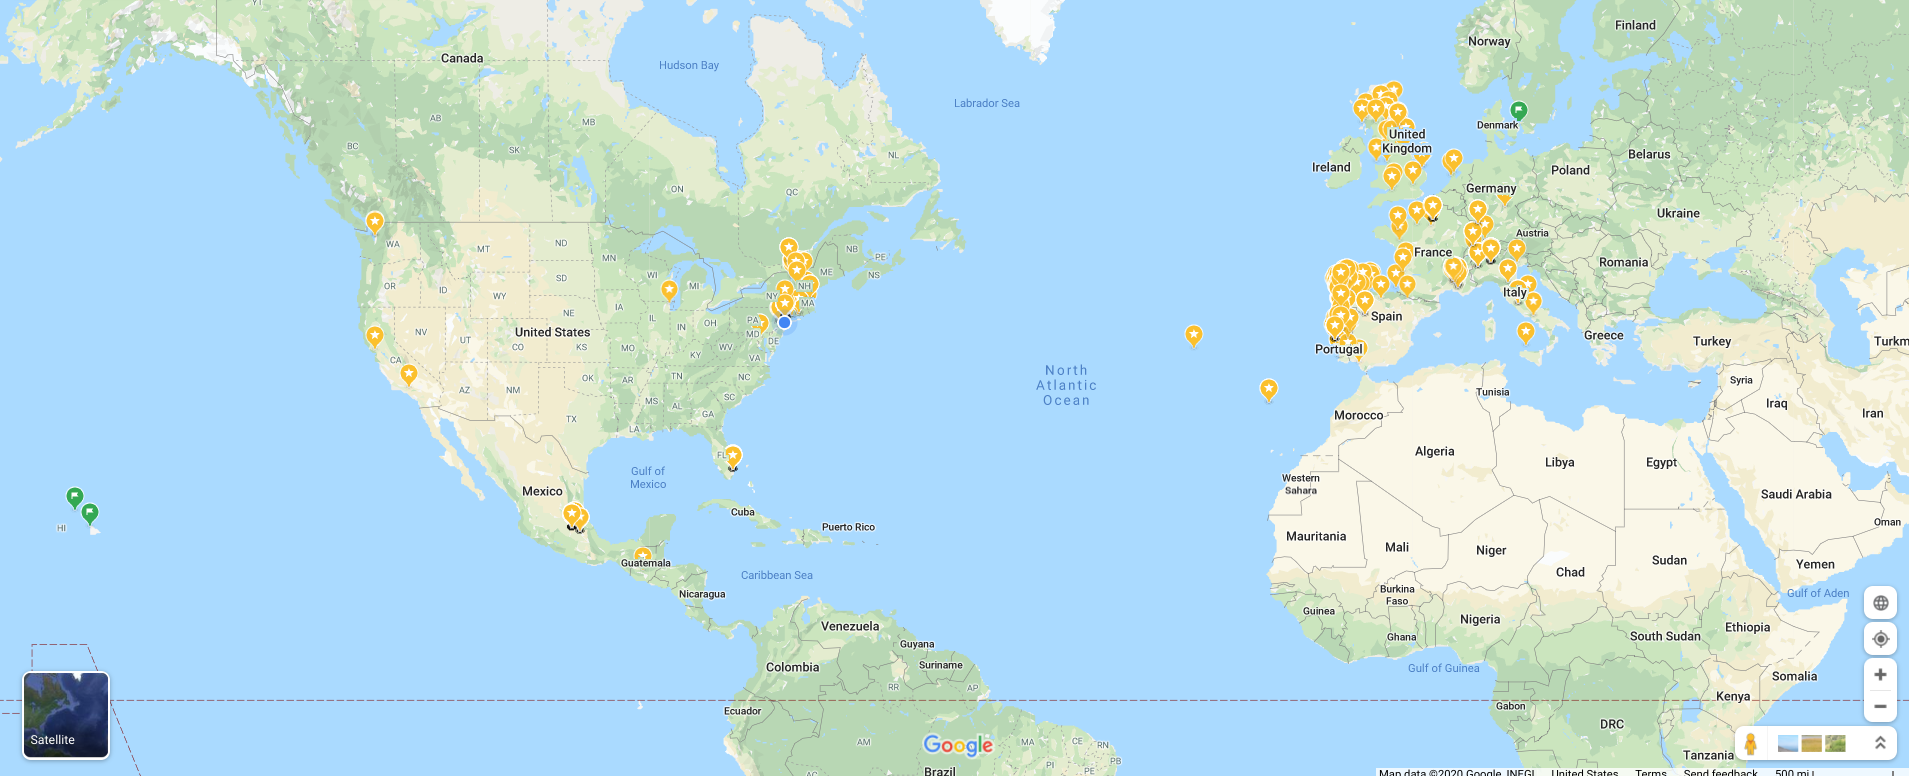
One of my favorite trip planning tricks is taking advantage of the dynamic tools within Google Maps to organize travel ideas. Google Maps can do so much to assist you: from storing favorite places to helping you choose a restaurant with the most romantic interior, plus measuring travel times and distances for road trips, hikes, bike rides, and more. The more you learn to use Google Maps’ many features, the more you will depend on it to plan vacation travel. My own Google Map now stores all of my favorite places across the globe, and helps to provide valuable insight and context to guide my every travel whim.

Using the Default Map vs. Creating Your Own Personal Map

You can use Google Maps in a couple ways: 1) you can build a personal map for a specific trip, or 2) you can keep it simple and utilize the default map, which you should do whether or not you have a trip in mind. Either way, I promise it’s fun and enormously helpful once you start using it. Don’t forget to log into your own Google account first, then anything you build or change will be saved to your account and you can access it anywhere.

If you decide you want to create a personal map (Menu >> Your Places >> Maps >> Create Map), there are design perks like color coding or selecting icons as labels for places. You can also share a personal map easily with friends. I prefer creating a personal map if I’m designing a trip for someone else so they can access, read, and understand it clearly. For my own personal travels, I typically use the default map, mainly saving places of interest using stars and flags, sneaking a peak of a place using Street View or place images, restaurant reviews, and more. Google Maps allows me to not just prepare for specific trips, but also to build a network of places all over the globe that become useful at totally unpredictable times!

Stars and Flags

In Google Maps, search for a place and click on it, and as you probably know you can read reviews and view the photographs submitted by fellow Google users. My favorite planning tool is to simply click the Save button and store a place to my default Google Map using a star or flag so I can find it again later. If you glance at my default Google Map, you will see approximately four thousand stars and flags I’ve placed all over the world, not because I’ve been to all of these places, but because I ran across them in an article, on Instagram, or while speaking with friends over dinner. Even if I am not certain I’ll ever make it to the place, I will place a star there just in case. I can’t remember all the times I have been grateful of my map of saved stars, realizing the cafe I’d read about two years ago happens to be right around the corner during a business trip to Chicago, for example. Some people go a step further and use various label types such as Favorites, Want to go, or a custom label name.

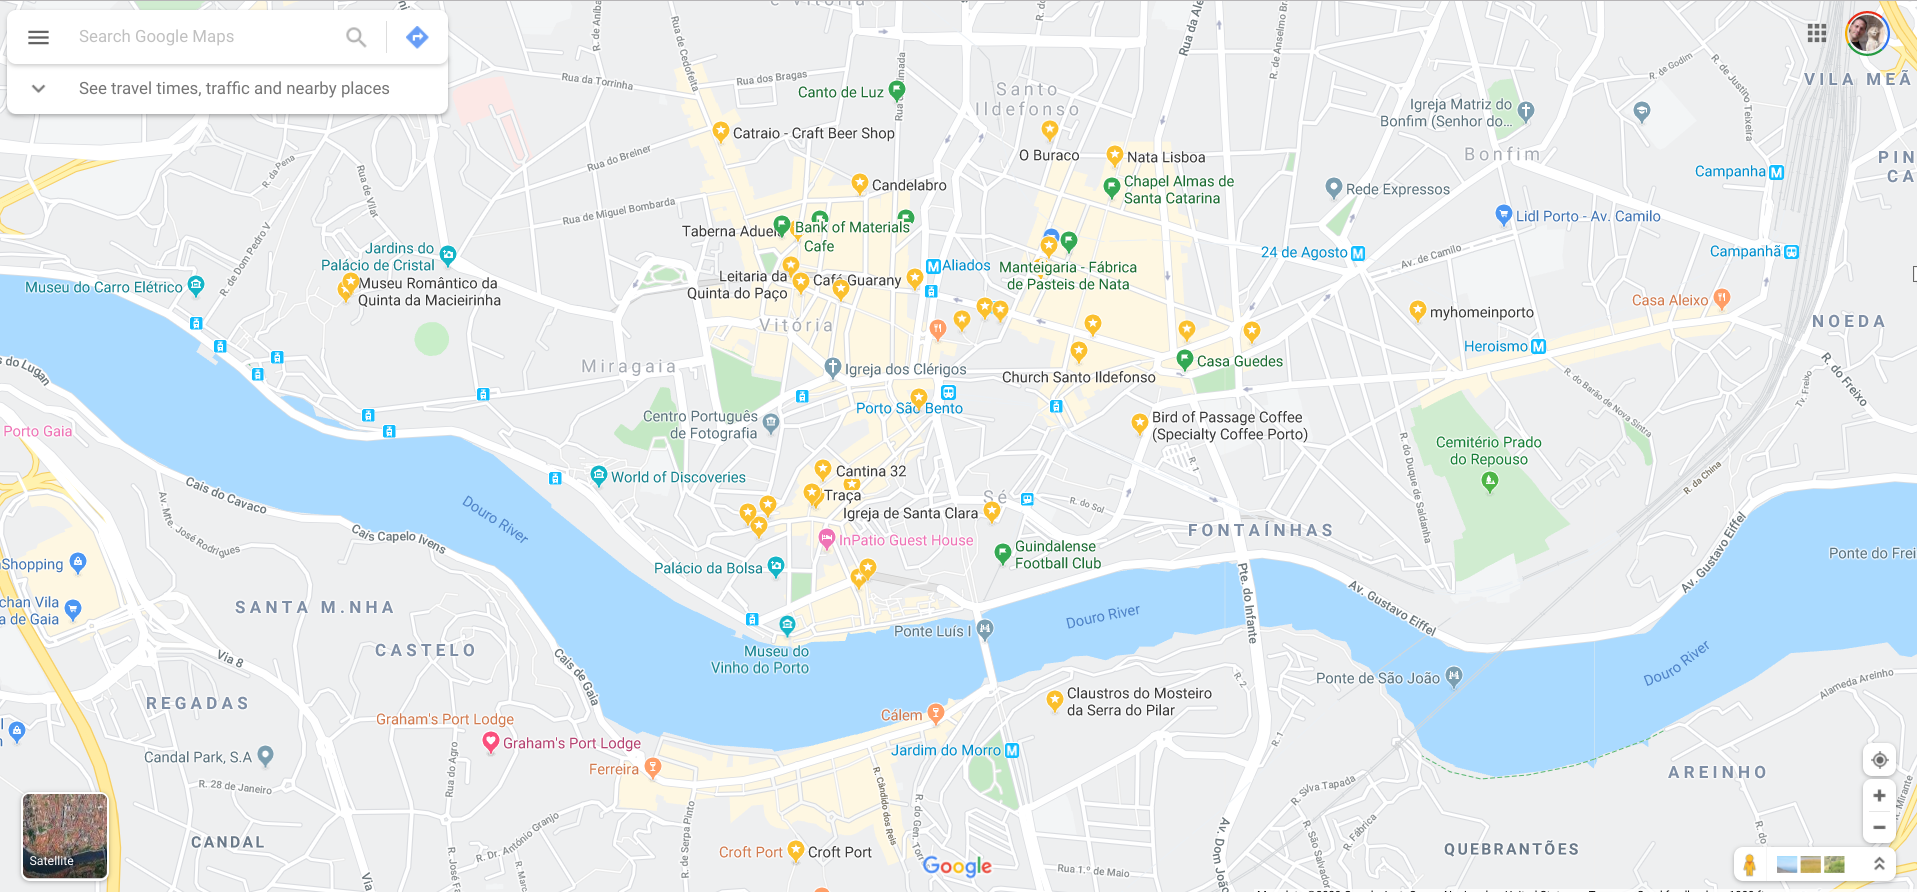
Porto, Portugal map showing my personal selection of stars and flags

Porto, Portugal map showing my personal selection of stars and flags

Street View or Satellite View

I know I’m a visual learner, but I think everyone can appreciate previewing a place before their trip. For example, if you you want to understand better how the area around that Airbnb apartment looks, you can do the walk the area in advance using the Street View feature in Google Maps. Trust me, it will feel comfortable when you’re there in person and you know a bit more what to expect. When you “walk around” a neighborhood or view more images of a specific foreign spot, you can become both increasingly excited to visit and even ease some anxieties that pop up about logistics when you visit someplace new. 

Directions

I don’t know about you, but I remember first using various map websites (Mapquest!) to simply print out step-by-step driving directions. Google Maps of course does this, but they can also reveal travel options and distances by car, train, bus, subway, bike or even by foot. 

Download Maps for Offline Use

Finally, right before leaving for a trip, I download maps of any destination city, so I know I’ll have details and directions in that place available to me even without internet. Instructions on how to download a map to your phone are simple. Open Google Maps on your phone and search for the location you want to save. Tap the bottom info bar and then tap Download. Choose the perimeters of the area you want to save and you’re done! You’ll find your downloaded offline map in Menu >> Offline Maps.

Crafting A Customized Travel Document

risd_art_museum_hands.jpg

What Is This Travel Document You Speak Of?

If you have never created one, you may need some convincing before you spend time building your own travel document. As you know, there are several excellent guide books in print, so why not just spend $20 on a pretty guide book, circle the things you want to see, and take margin notes for the rest?

Great point! It’s tempting and I used to travel that way; armed with a trusted guide book or two, a few notes scribbled here and there. But over the years, I found myself frustrated using guide books that were only 20% applicable to my trip, forced to maneuver the verbose and impersonal design of some corporate publication. Eventually, I took total control over my own trips and had a ton of fun in the process.

This Sounds Like Too Much Work!

It is work, but it’s purely the good kind! I find the process of planning for an upcoming trip to be as exciting as much of the trip itself, especially when the destination will be my first visit and the research is completely fresh. I am often asked by friends for travel advice, like favorite restaurants and museums, but one less obvious thing I love about travel is the creation of a beloved, customized travel document.

What Does A Travel Document Look Like?

 
sample_travel_document_itinerary.png
 

A travel document can look exactly how you want it to look! But it should act as a catch-all for any solid plans, exciting options, and emergency information needed before and during a trip. A personalized, totally customized travel guide made by you, for you. My personalized travel document usually includes these sections:

Daily Itinerary A table. Each day gets its own row and a few daily goals or any booked reservations

Emergency Information Mostly phone numbers (bank, family, etc)

Flight Details Airlines, departure and arrival times, airport transport detail

Hotel / Lodging Information Address, phone, directions, booking numbers

Rental Car Information Booking number, location

Restaurants Reservations, lunch ideas, and back-up options

Shopping Home good stores, clothing, local specialty shops, markets, etc

Culture and Activities Museums, parks, excursions

Bars I like to have a list of exceptional beer, wine, and liquor stops should the occasion arise

Coffee & Treats This helps me track all the top rated coffee shops in the area, but also where I list pastry shops, candy stores, ice cream, etc

OK, Let’s Get This Party Started

I create my travel documents using Google Docs, then share it with my partner. It becomes a working document we build together after getting ideas from reading various guide books, articles and speaking with well-traveled friends. Eventually we order ideas by priority, star items that interest us most and figure out which activities need advanced booking.

Fear of Structure?

You may dislike the idea of making too many decisions in advance of your trip. Organizing your options in advance should never feel like it’s squashing the excitement of travel. You never want to eliminate every element of discovery by writing your itinerary in stone before leaving home, but you want to do enough organized research, that when you find yourself with free time, you have your travel document as both a wonderful resource and ultimately a time-saver that doesn’t leave you scrambling for a plan in a foreign place.

And don’t forget, since you designed your travel document, you feel more empowered to pick and choose your own adventure before and during your travels!

spanish_steps_rome.jpg